🚩 Challenge #3: 🎟 Multisig Wallet
⚠️ Important: Please complete Challenge #2 first if you haven't already, as it contains essential instructions related to all upcoming challenges.
🎛️ Multisig Wallet on Stylus 💼
🚀 Overview
Welcome to the Multi-Signature (Multisig) Wallet challenge! This project demonstrates a secure way to manage funds on the blockchain using a Rust-based smart contract built with the Stylus SDK. A multisig wallet requires multiple parties to approve transactions, enhancing security by distributing control among several owners.
✨ Key Features
- 🔒 Multi-Signature Security: Transactions require approval from a predefined number of wallet owners, preventing unauthorized access.
- 📝 Transaction Management: Owners can submit, confirm, revoke, and execute transactions with full transparency.
- 👥 Owner Roles: Assign multiple owners with unique permissions to collaboratively manage the wallet.
- 📊 Activity Logs: Emit detailed events for every wallet operation, ensuring auditability and traceability.
🌟 Project Goals
1️⃣ Smart Contract: Develop a robust multi-signature wallet for secure fund and transaction management. 2️⃣ Frontend App: Build an intuitive interface for interacting with the wallet, making it easy to manage transactions. 3️⃣ Deploy: Launch the contract on a Local Nitro Dev Node for testing and development.
🎉 Let's redefine secure fund management with multisig wallets! 🚀
💡 What is a Multi-Signature Wallet?
A multi-signature wallet is a blockchain-based account that requires multiple private keys to authorize transactions. Unlike a single-signature wallet, where one person has full control, a multisig wallet distributes authority among several owners. For example, in a 2-of-3 multisig wallet, at least 2 out of 3 owners must approve a transaction before it can be executed. This setup is ideal for:
- Enhanced Security: Protects against theft or loss of a single key by requiring consensus.
- Shared Control: Perfect for teams, organizations, or families managing shared funds.
- Transparency: All actions are logged on the blockchain, providing an immutable record.
In this project, you'll interact with a multisig wallet smart contract written in Rust, deployed on a local Nitro node, and accessible via a user-friendly Next.js frontend.
Checkpoint 0: 📦 Environment Setup 📚
Before you begin, ensure you have the following tools installed:
- Node (>= v18.17)
- Yarn (v1 or v2+)
- Git
- Docker (for running the Nitro dev node)
Then, download the challenge to your computer and install dependencies by running:
⚠️ IMPORTANT: Run the commands below in WSL (Windows Subsystem for Linux) only. PowerShell may cause errors due to unsupported file formats.
git clone -b multi-sig https://github.com/abhi152003/speedrun_stylus.git
cd speedrun_stylus
yarn install
In the same terminal, after all dependencies are installed, run the commands below to start the local dev node in Docker. This script will deploy the contract and generate the ABI for interaction:
cd speedrun_stylus # if not done
cd packages
cd cargo-stylus
cd multi-sig
Now open your Docker desktop and then return to your IDE and run the command below to spin up the nitro devnode in Docker. This will deploy the contract and generate the ABI so you can interact with the contracts written in RUST:
bash run-dev-node.sh
This command will spin up the nitro devnode in Docker. You can check it out in your Docker desktop. This will take some time to deploy the RUST contract, and then the script will automatically generate the ABI. You can view all these transactions in your terminal and Docker desktop. The Docker node is running at localhost:8547, but before running this command make sure about the below thing
🚨 Fixing Line Endings and Running Shell Scripts in WSL on a CRLF-Based Windows System
⚠️ This guide resolves the "Command not found" error caused by CRLF line endings in shell scripts when running in a WSL environment.
🛠️ Steps to Fix the Issue
Convert Line Endings to LF
Shell scripts created in Windows often have CRLF line endings, which cause issues in Unix-like environments such as WSL. To fix this:
Using dos2unix
-
Install
dos2unix(if not already installed):sudo apt install dos2unix -
Convert the script's line endings:
dos2unix run-dev-node.sh -
Make the Script Executable:
chmod +x run-dev-node.sh -
Run the Script in WSL:
bash run-dev-node.sh
In the same WSL terminal window or at the Docker Desktop terminal, view the details of your contract deployment, including the deployment transaction hash for later verification.
Then, in a second WSL terminal window, start your 📱 frontend:
⚠️ Before running the frontend:
Go to the
packages/nextjsdirectory:cd packages/nextjs cp .env.example .envOpen the
.envfile and set:NEXT_PUBLIC_RPC_URL=http://localhost:8547 NEXT_PUBLIC_PRIVATE_KEY=your_private_key_of_your_ethereum_wallet(For Sepolia, see instructions below.)
cd packages/nextjs
yarn run dev OR yarn dev
📱 Open http://localhost:3000 to see the app.
📊 Performance Tracking
Before submitting your challenge, you can run the performance tracking script to analyze your application:
-
Navigate to the performance tracking directory:
cd packages/nextjs/services/web3 -
Update the contract address: Open the
performanceTracking.jsfile and paste the contract address that was deployed on your local node. (you can get contract address same as we have mentioned above in Docker_Img) -
Run the performance tracking script:
node performanceTracking.js
This will provide insights about the savings when you cache your deployed contract. The output will show performance analysis similar to the image below:
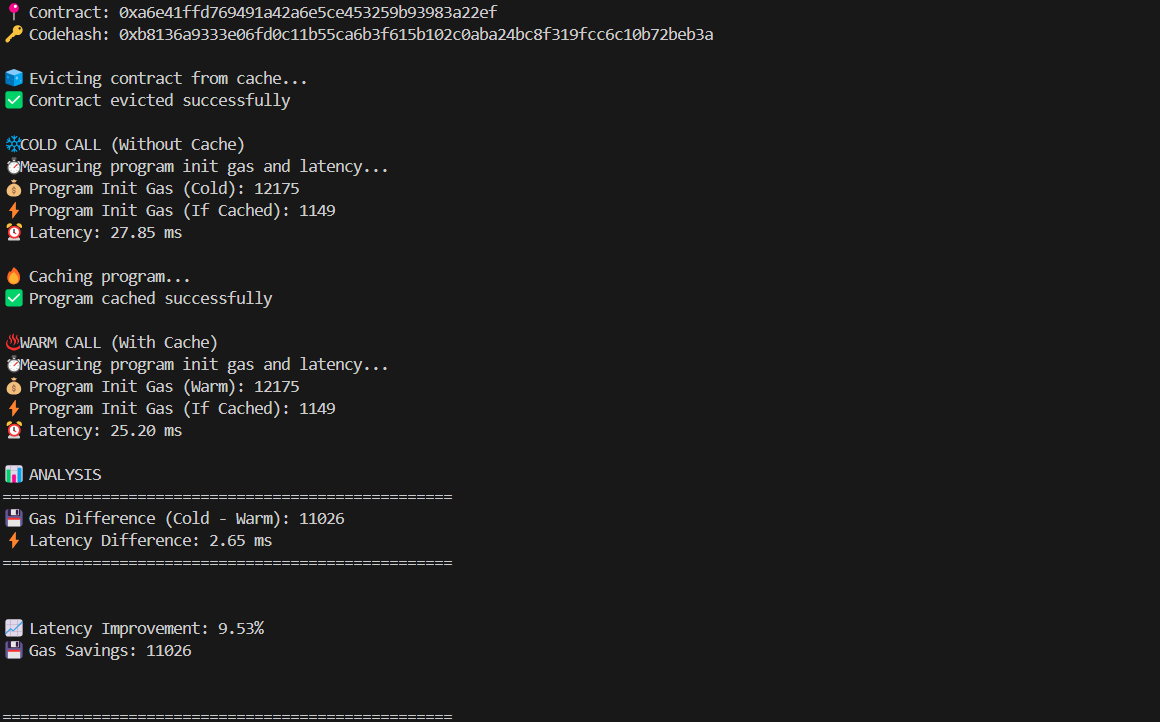
📝 Important: Make sure to note down the Latency Improvement and Gas Savings values from the output, as you'll need to include these metrics when submitting your challenge.
💫 Checkpoint 1: Frontend Magic
After completing Checkpoint 0, interact with your contract via the frontend. Click on "Debug Contracts" from the Navbar or the Debug Contracts section on the screen.
🛠️ Frontend Features and User Flow
The interface guides you through the multisig wallet process with the following steps:
Step 1: Initialize the Contract
- Set Owners: Provide a comma-separated list of owner addresses (e.g.,
0x123..., 0x456...). - Define Confirmation Requirements: Specify the number of confirmations needed for a transaction to execute (must be between 1 and the number of owners).
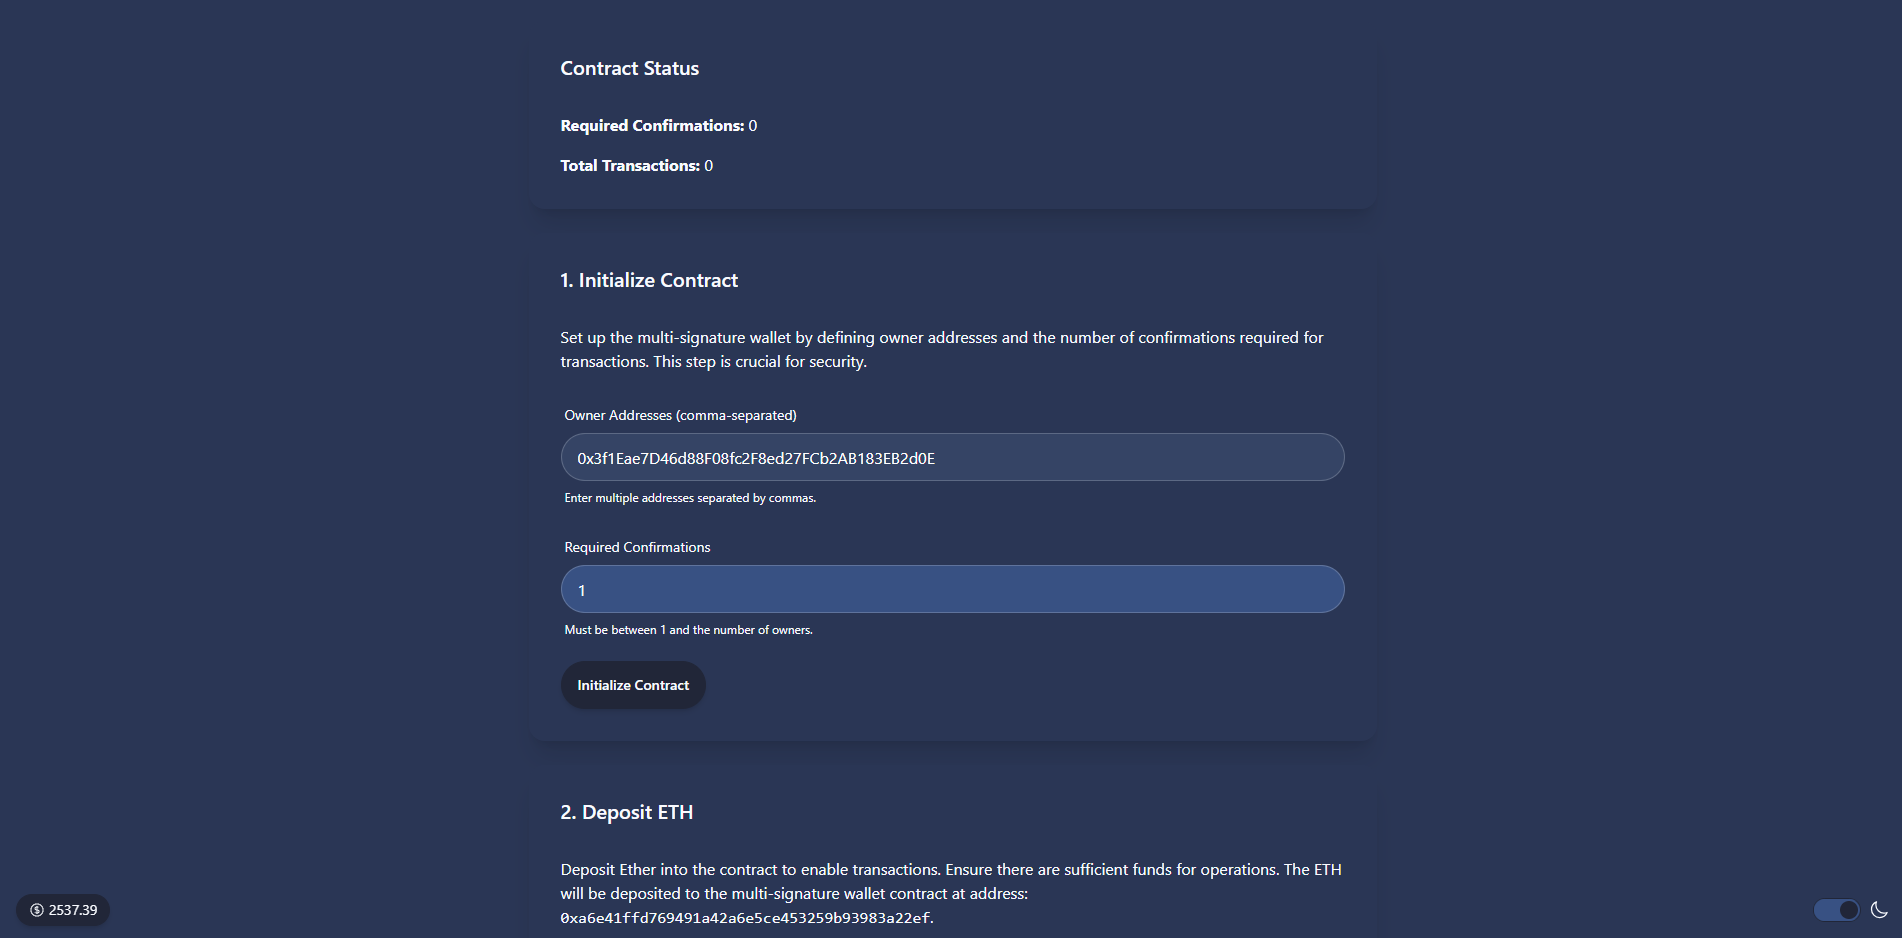
Why? This establishes the security framework by defining who controls the wallet and how many approvals are needed, preventing single-point failures.
Step 2: Deposit ETH
- Deposit Funds: Send ETH to the contract to fund transactions.
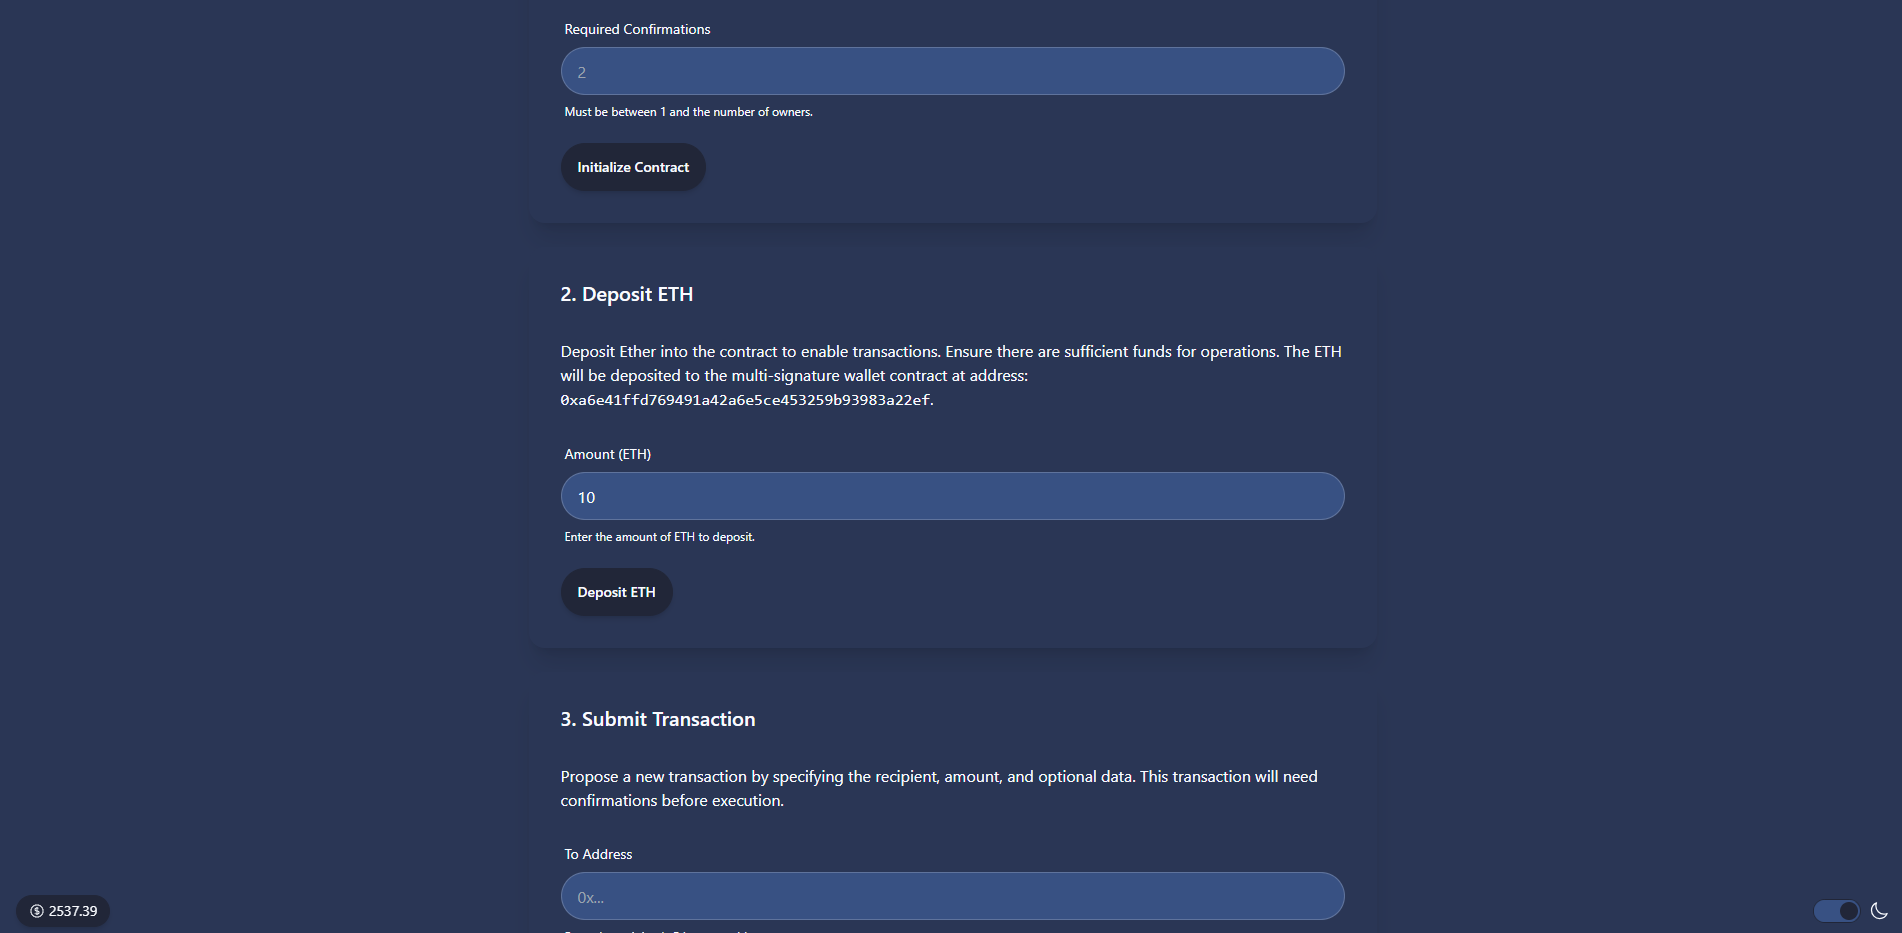 Why? Funds are necessary for the wallet to operate. This step ensures the contract has the necessary balance for outgoing transactions.
Step 3: Submit a Transaction
- Enter Details: Specify the recipient address, ETH amount, and optional hex data for smart contract interactions.
- Submit: Add the transaction to the pending list for owner approval.
 Why? This initiates the transaction process, allowing owners to review and approve before execution.
Note : You'll be able to see your transaction index at the top of the page which you can use to perform the next steps.

Step 4: Confirm a Transaction
- Approve: Owners confirm transactions using the transaction index.
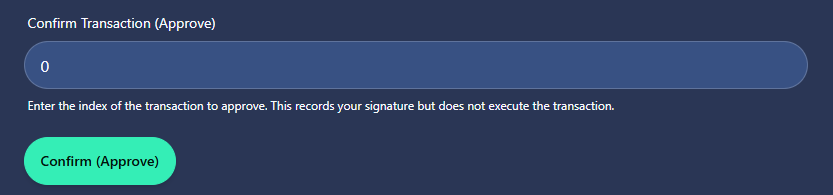 Why? Confirmations ensure consensus among owners, a core security feature of multisig wallets.
Step 5: Execute a Transaction
- Check Status: Verify if the required confirmations are met.
- Execute: Transfer funds to the recipient once approved.
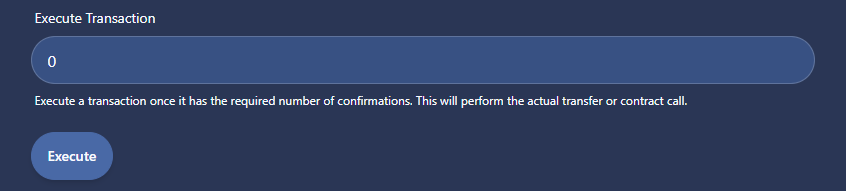 Why? Execution finalizes the transaction, securely transferring funds only after consensus.
Step 6: Revoke Confirmation (Optional)
- Revoke: Owners can withdraw their confirmation if they change their mind before execution.
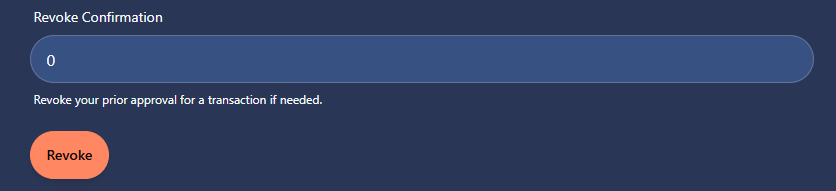 Why? Adds flexibility, allowing owners to adapt to new information or concerns.
Step 7: Check Contract Details
- Owner Status: Verify if an address is an owner.
- Contract Stats: View total transactions and required confirmations.
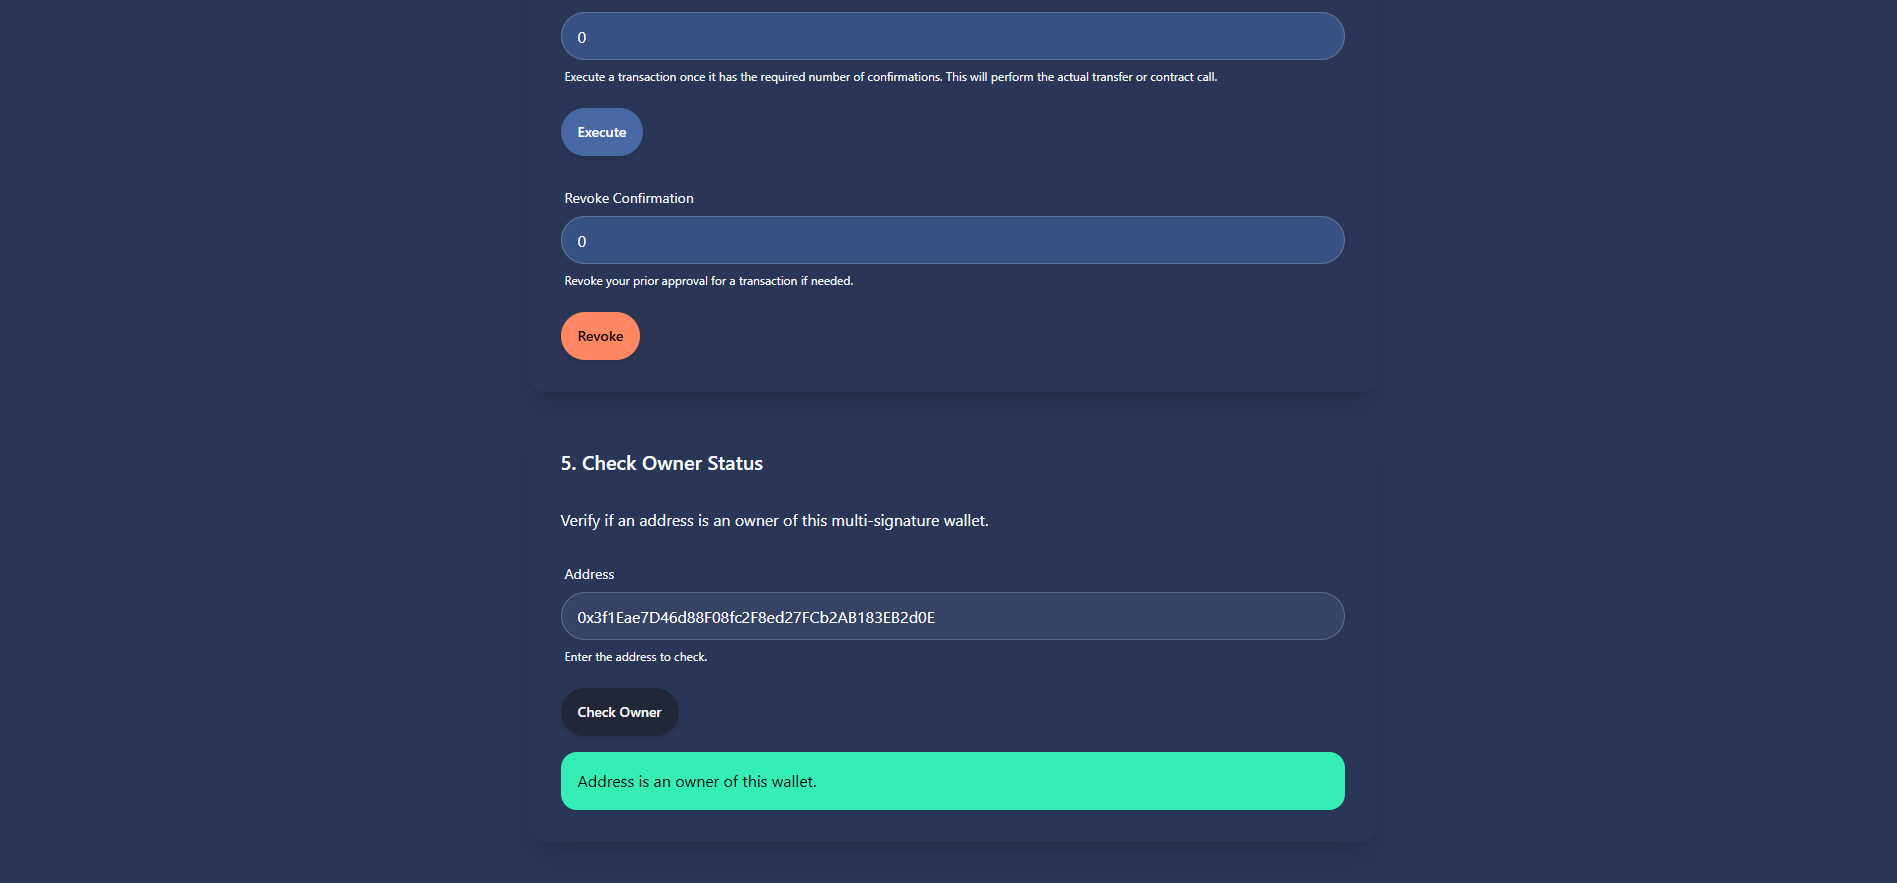 Why? Provides transparency and easy access to critical wallet information.
Step 8: Track Transactions
- Blockchain Explorer: Links to transaction details for on-chain verification.
Why? Enhances trust by allowing users to independently verify wallet activity on the blockchain.
💼 Take a quick look at your deploy script run-dev-node.sh in speedrun_stylus/packages/cargo-stylus/multi-sig/run-dev-node.sh.
📝 To edit the frontend, navigate to speedrun_stylus/packages/nextjs/app and open the specific page you want to modify, such as /debug/page.tsx. For guidance on routing and configuring pages/layouts, check the Next.js documentation.
Checkpoint 2: 💾 Deploy Your Contract! 🛰
🛰 You don't need to provide specifications to deploy your contract because it is automatically deployed via run-dev-node.sh.
Check the deployment process below:
The above command deploys the contract functions defined in speedrun_stylus/packages/cargo-stylus/multi-sig/src/lib.rs.
This local account deploys your contracts using a pre-funded account's private key, so you don't need to enter a personal key.
Checkpoint 3: 🚢 Ship Your Frontend! 🚁
Contracts are deployed at the
localhost:8547endpoint where the Nitro dev node runs in Docker. Verify the network in the frontend at http://localhost:3000:
🚀 Deploy Your NextJS App
vercel
Follow the steps to deploy to Vercel. Once logged in (via email, GitHub, etc.), the default options should work. You'll receive a public URL.
To redeploy to the same production URL, run
yarn vercel --prod. Omitting the--prodflag deploys to a preview/test URL.
Checkpoint 4: 📜 Contract Verification
Verify your smart contract by running:
cargo stylus verify -e http://127.0.0.1:8547 --deployment-tx "$deployment_tx"
# Deployment_tx can be obtained from the Docker Desktop terminal after contract deployment.
It's okay if it says your contract is already verified.
If you want to redeploy after verification, use:
cargo stylus deploy -e http://127.0.0.1:8547 --private-key "$your_private_key"
# You can use the pre-funded account's private key as well.
🚀 Deploying to Arbitrum Sepolia
If you want to deploy your Vending Machine contract to the Arbitrum Sepolia testnet, follow these steps:
-
Export your private key in the terminal
export PRIVATE_KEY=your_private_key_of_your_ethereum_wallet -
Run the Sepolia Deployment Script
cd packages/cargo-stylus/vending_machine
bash run-sepolia-deploy.sh
This will deploy your contract to Arbitrum Sepolia and output the contract address and transaction hash.
-
Configure the Frontend for Sepolia
- Go to the
packages/nextjsdirectory:cd packages/nextjs cp .env.example .env - Open the
.envfile and set the following variables:
ReplaceNEXT_PUBLIC_RPC_URL=https://sepolia-rollup.arbitrum.io/rpc NEXT_PUBLIC_PRIVATE_KEY=your_private_key_of_your_ethereum_walletyour_private_key_of_your_ethereum_walletwith your actual Ethereum wallet private key (never share this key publicly).
- Go to the
-
Start the Frontend
yarn run devYour frontend will now connect to the Arbitrum Sepolia network and interact with your deployed contract.
⚡️ Cache Your Deployed Contract for Faster, Cheaper Access
📖 Contracts deployed on Arbitrum Sepolia can use this command for gas benefits, time savings, and cheaper contract function calls. Our backend will benchmark and place bids on your behalf to ensure your contract is not evicted from the CacheManager contract, fully automating this process for you.
Before caching your contract, make sure you have installed the Smart Cache CLI globally:
npm install -g smart-cache-cli
After deploying your contract to Arbitrum Sepolia, you can cache your contract address using the smart-cache CLI. Caching your contract enables:
- 🚀 Faster contract function calls by reducing lookup time
- 💸 Cheaper interactions by optimizing access to contract data
- 🌐 Seamless access to your contract from any environment or system
💡 Info: Both the
<address>and--deployed-byflags are mandatory when adding a contract to the cache.
📝 Simple Example
smart-cache add <CONTRACT_ADDRESS> --deployed-by <YOUR_WALLET_ADDRESS_WITH_WHOM_YOU_HAVE_DEPLOYED_CONTRACT>
🛠️ Advanced Example
smart-cache add 0xYourContractAddress \
  --deployed-by 0xYourWalletAddress \
  --network arbitrum-sepolia \
  --tx-hash 0xYourDeploymentTxHash \
  --name "YourContractName" \
  --version "1.0.0"
<CONTRACT_ADDRESS>: The address of your deployed contract (required)--deployed-by: The wallet address you used to deploy the contract (required)--network arbitrum-sepolia: By default, contracts are cached for the Arbitrum Sepolia network for optimal benchmarking and compatibility--tx-hash,--name,--version: Optional metadata for better organization
⚠️ Warning: If you omit the required fields, the command will not work as expected.
💡 For more options, run
smart-cache add --help.
For more in-depth details and the latest updates, visit the smart-cache-cli package on npmjs.com.
🔍 Analyze Your Contract with Radar
Radar by Auditware is a powerful static analysis tool designed to identify security vulnerabilities in Rust-based smart contracts. It uses a rule engine to detect common security issues like unchecked arithmetic, missing access controls, and account validation problems.
📦 Installation
Radar requires Docker to be installed and running on your system. Make sure Docker is installed and running before proceeding.
Install Radar using the official installation script: (⚠️ Windows users must use a WSL terminal)
curl -L https://raw.githubusercontent.com/auditware/radar/main/install-radar.sh | bash
This will install Radar globally on your system. Alternatively, you can install from source:
git clone https://github.com/auditware/radar.git
cd radar
bash install-radar.sh
Note: After installation, you must restart your terminal or run the following command so the system recognizes the newly installed radar:
source ~/.bashrc
🚀 Running Radar on Your Contract
From the root of your project, run Radar with:
radar -p .
This will analyze your entire project, including all contract code using Radar.
Radar will output:
- Console output: Real-time findings with severity levels (Low, Medium, High)
- JSON report: Detailed results saved to
output.jsonin your project directory
Example Output:
[ Low ] Unchecked Arithmetics found at:
 * /path/to/your/contract/src/lib.rs:49:34-44

[i] radar completed successfully. json results were saved to disk.
[i] Results written to /path/to/output.json
💡 Tip: The JSON output (
output.json) contains detailed information about each check, including severity, certainty, and locations of issues. Review it carefully to understand what needs to be fixed.
🏁 Next Steps
Explore more challenges or contribute to this project!
🏃 Head to your next challenge here.