🚩 Challenge #0: 🎟 Simple Counter Example
🎫 Create a simple Counter:
👷♀️ You'll compile and deploy your first smart contracts. Then, you'll use a template React app full of important components and hooks. Finally, you'll deploy a Counter contract written in RUST to a public network to share with friends! 🚀
🌟 The final deliverable is an app that lets users interact with the counter contract. Deploy your contracts to a testnet, then build and upload your app to a public web server.
Checkpoint 0: 📦 Prerequisites 📚
Before starting, ensure you have the following installed:
-
Rust (including
rustc,rustup, andcargo) - Install with (⚠️ Must use WSL terminal to run these commands):curl --proto '=https' --tlsv1.2 -sSf https://sh.rustup.rs | shsource ~/.bashrc # or restart your terminal -
cargo-stylus
-> Install cargo-stylus with the below command:cargo install cargo-stylus⚠️ Note for Ubuntu users: If you face issues related to pkg-config while trying to install cargo-stylus, run these commands:
sudo apt update sudo apt install pkg-config sudo apt install libssl-dev sudo apt install build-essential -
Foundry - Required for smart contract development
Foundry Installation Steps:
1. Open your WSL terminal.
2. Install Foundry using the official install script:
curl -L https://foundry.paradigm.xyz | bash
3. Add Foundry to your shell profile
After installation, you'll see instructions to add Foundry to your shell profile (like .bashrc or .zshrc). Usually, you can do:
export PATH="$HOME/.foundry/bin:$PATH"
Add the above line to your ~/.bashrc or ~/.zshrc file, then reload your shell:
source ~/.bashrc
source ~/.zshrc
4. Install Foundry binaries
foundryup
🔧 Version Requirements
Ensure your tools are ready to use:
Check your versions - ⚠️ Must use WSL terminal to run these commands
cargo stylus --version
cargo --version
rustup --version
rustc --version
curl --version
cast --version
forge --version
🚩 Challenge Setup Instructions
For Ubuntu/Mac Users:
-
Open your terminal.
-
Clone the repository:
git clone -b counter https://github.com/abhi152003/speedrun_stylus.git speedrun_stylus_countercd speedrun_stylus_counteryarn install -
Start the local devnode in Docker:
cd packages/stylus-demobash run-dev-node.sh -
In a second terminal window, start your frontend:
cd speedrun_stylus_counter/packages/nextjsyarn run dev -
Open http://localhost:3000 to see the app.
⚠️ Important: Contract Address Setup
After running the devnode script, copy the contract address from the bash terminal output. You will need to paste this address into the contractAddress variable in the DebugContract component.
💡 Note: If both contract addresses are the same, you don't need to do anything - you're ready to go and interact with the stylus-based smart contracts written in RUST!
Docker_Img
For Windows Users (Using WSL):
📝 Note: After completing step 4 below, make sure to follow the "Contract Address Setup" section above for configuring your contract address.
-
Open your WSL terminal.
-
Ensure you have set your Git username and email globally:
git config --global user.name "Your Name"git config --global user.email "your.email@example.com" -
Clone the repository:
git clone -b counter https://github.com/abhi152003/speedrun_stylus.gitcd speedrun_stylusyarn install -
Start the local devnode in Docker:
cd packages/stylus-demobash run-dev-node.sh -
In a second WSL terminal window, start your frontend:
cd speedrun_stylus/packages/nextjsyarn run dev -
Open http://localhost:3000 to see the app.
🛠️ Troubleshooting Common Issues
1. stylus Not Recognized
If you encounter an error stating that stylus is not recognized as an external or internal command, run the following command in your terminal:
sudo apt-get update && sudo apt-get install -y pkg-config libssl-dev
After that, check if stylus is installed by running:
cargo stylus --version
If the version is displayed, stylus has been successfully installed and the path is correctly set.
2. ABI Not Generated
If you face issues with the ABI not being generated, you can try one of the following solutions:
-
Restart Docker Node: Pause and restart the Docker node and the local setup of the project. You can do this by deleting all ongoing running containers and then restarting the local terminal using:
yarn run dev -
Modify the Script: In the
run-dev-node.shscript, replace the line:cargo stylus export-abiwith:
cargo run --manifest-path=Cargo.toml --features export-abi -
Access Denied Issue: If you encounter an access denied permission error during ABI generation, run the following command and then execute the script again:
sudo chown -R $USER:$USER target
3. 🚨 Fixing Line Endings and Running Shell Scripts in WSL
⚠️ This guide provides step-by-step instructions to resolve the Command not found error caused by CRLF line endings in shell scripts when running in a WSL environment.
Shell scripts created in Windows often have CRLF line endings, which cause issues in Unix-like environments such as WSL. To fix this:
Using dos2unix:
-
Install
dos2unix(if not already installed):sudo apt install dos2unix -
Convert the script's line endings:
dos2unix run-dev-node.sh -
Make the Script Executable:
chmod +x run-dev-node.sh -
Run the Script in WSL:
bash run-dev-node.sh
📊 Performance Tracking
Before submitting your challenge, you can run the performance tracking script to analyze your application:
-
Navigate to the performance tracking directory:
cd packages/nextjs/services/web3 -
Update the contract address: Open the
performanceTracking.jsfile and paste the contract address that was deployed on your local node. (you can get contract address same as we have mentioned above in Docker_Img) -
Run the performance tracking script:
node performanceTracking.js
This will provide insights about the savings when you cache your deployed contract. The output will show performance analysis similar to the image below:
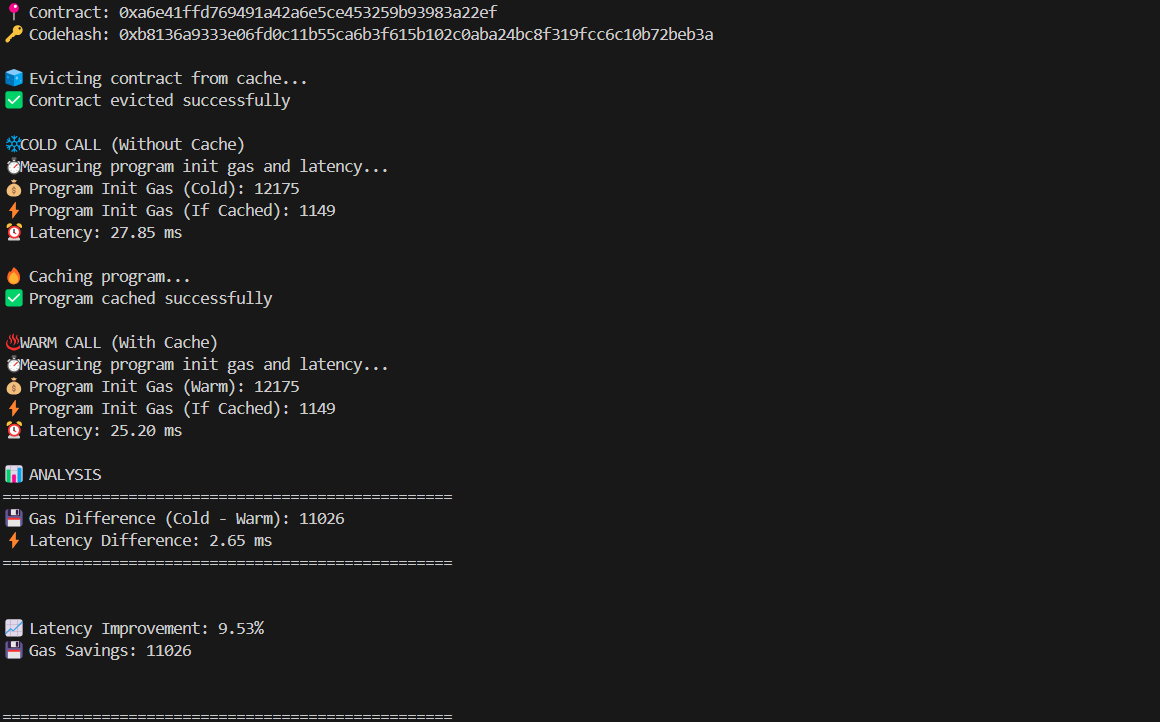
📝 Important: Make sure to note down the Latency Improvement and Gas Savings values from the output, as you'll need to include these metrics when submitting your challenge.
🚀 Submitting Your Challenge
After you have completed the setup and are ready to submit your solution, follow these steps:
-
Create a New GitHub Repository
- Go to GitHub and create a new repository (public or private as required by the challenge).
-
Set Your Local Repository's Remote URL
- In your project directory, update the remote URL to your new repository:
git remote set-url origin https://github.com/yourusername/your-repo.git
- In your project directory, update the remote URL to your new repository:
-
Push Your Code to GitHub
- Add and commit any changes if you haven't already:
git add . git commit -m "Initial commit for challenge submission" - Push your code:
git push -u origin counter
- Add and commit any changes if you haven't already:
-
Submit Your Challenge
- Copy your repository link in the following format (without
.gitat the end):https://github.com/yourusername/your-repo - Use this link to submit your challenge as instructed.
- Copy your repository link in the following format (without
💫 Checkpoint 1: Frontend Magic
⛽ You'll be redirected to the below page after you complete checkpoint 0
Then you have to click on the debug contracts to start interacting with your contract. Click on "Debug Contracts" from the Navbar or from the Debug Contracts Div placed in the middle of the screen
The interface allows you to:
- Set any number
- Add numbers
- Increment count
- Perform multiplications
- Track all transactions in the Block Explorer
After that, you can easily view all of your transactions from the Block Explorer Tab
💼 Take a quick look at your deploy script run-dev-node.sh in speedrun-rust/packages/stylus-demo/run-dev-node.sh.
📝 If you want to edit the frontend, navigate to speedrun-rust/packages/nextjs/app and open the specific page you want to modify. For instance: /debug/page.tsx. For guidance on routing and configuring pages/layouts checkout the Next.js documentation.
Checkpoint 2: 💾 Deploy your contract! 🛰
🛰 You don't need to provide any specifications to deploy your contract because contracts are automatically deployed from the run-dev-node.sh
You can check that below :
The above command will automatically deploy the contract functions written inside speedrun_stylus/packages/stylus-demo/src/lib.rs
This local account will deploy your contracts, allowing you to avoid entering a personal private key because the deployment happens using the pre-funded account's private key.
Checkpoint 3: 🚢 Ship your frontend! 🚁
We are deploying all the RUST contracts at the
localhost:8547endpoint where the nitro devnode is spinning up in Docker. You can check the network where your contract has been deployed in the frontend (http://localhost:3000):
🚀 Deploy your NextJS App
yarn vercel
Follow the steps to deploy to Vercel. Once you log in (email, github, etc), the default options should work. It'll give you a public URL.
If you want to redeploy to the same production URL you can run
yarn vercel --prod. If you omit the--prodflag it will deploy it to a preview/test URL.
⚠️ Run the automated testing function to make sure your app passes
yarn test
Checkpoint 4: 📜 Contract Verification
You can verify your smart contract by running:
cargo stylus verify -e http://127.0.0.1:8547 --deployment-tx "$deployment_tx"
cargo stylus deploy -e http://127.0.0.1:8547 --private-key "$your_private_key"
It is okay if it says your contract is already verified.
🚀 Deploying to Arbitrum Sepolia
If you want to deploy your contract to the Arbitrum Sepolia testnet, follow these steps:
-
Run the Sepolia Deployment Script
Export your private key in the terminal :
export PRIVATE_KEY=your_private_key_of_your_ethereum_walletOpen your terminal and run:
cd packages/stylus-demo
bash run-sepolia-deploy.sh
This will deploy your contract to Arbitrum Sepolia and output the contract address and transaction hash.
-
Configure the Frontend for Sepolia
- Go to the
packages/nextjsdirectory:cd packages/nextjs - Copy the example environment file:
cp .env.example .env - Open the
.envfile and set the following variables:
ReplaceNEXT_PUBLIC_RPC_URL=https://sepolia-rollup.arbitrum.io/rpc NEXT_PUBLIC_PRIVATE_KEY=0xyour_private_key_of_your_ethereum_walletyour_private_key_of_your_ethereum_walletwith your actual Ethereum wallet private key (never share this key publicly).
- Go to the
-
Start the Frontend
yarn run devYour frontend will now connect to the Arbitrum Sepolia network and interact with your deployed contract.
Note : Don't forget to change the contract address in the
DebugContracts.tsxfile to the one you deployed to arbitrum sepolia before running the frontend.
⚡️ Cache Your Deployed Contract for Faster, Cheaper Access
📖 Contracts deployed on Arbitrum Sepolia can use this command for gas benefits, time savings, and cheaper contract function calls. Our backend will benchmark and place bids on your behalf to ensure your contract is not evicted from the CacheManager contract, fully automating this process for you.
Before caching your contract, make sure you have installed the Smart Cache CLI globally:
npm install -g smart-cache-cli
After deploying your contract to Arbitrum Sepolia, you can cache your contract address using the smart-cache CLI. Caching your contract enables:
- 🚀 Faster contract function calls by reducing lookup time
- 💸 Cheaper interactions by optimizing access to contract data
- 🌐 Seamless access to your contract from any environment or system
💡 Info: Both the
<address>and--deployed-byflags are mandatory when adding a contract to the cache.
📝 Simple Example
smart-cache add <CONTRACT_ADDRESS> --deployed-by <YOUR_WALLET_ADDRESS_WITH_WHOM_YOU_HAVE_DEPLOYED_CONTRACT>
🛠️ Advanced Example
smart-cache add 0xYourContractAddress \
  --deployed-by 0xYourWalletAddress \
  --network arbitrum-sepolia \
  --tx-hash 0xYourDeploymentTxHash \
  --name "YourContractName" \
  --version "1.0.0"
<CONTRACT_ADDRESS>: The address of your deployed contract (required)--deployed-by: The wallet address you used to deploy the contract (required)--network arbitrum-sepolia: By default, contracts are cached for the Arbitrum Sepolia network for optimal benchmarking and compatibility--tx-hash,--name,--version: Optional metadata for better organization
⚠️ Warning: If you omit the required fields, the command will not work as expected.
💡 For more options, run
smart-cache add --help.
For more in-depth details and the latest updates, visit the smart-cache-cli package on npmjs.com.
🔍 Analyze Your Contract with Radar
Radar by Auditware is a powerful static analysis tool designed to identify security vulnerabilities in Rust-based smart contracts. It uses a rule engine to detect common security issues like unchecked arithmetic, missing access controls, and account validation problems.
📦 Installation
Radar requires Docker to be installed and running on your system. Make sure Docker is installed and running before proceeding.
Install Radar using the official installation script: (⚠️ Windows users must use a WSL terminal)
curl -L https://raw.githubusercontent.com/auditware/radar/main/install-radar.sh | bash
This will install Radar globally on your system. Alternatively, you can install from source:
git clone https://github.com/auditware/radar.git
cd radar
bash install-radar.sh
Note: After installation, you must restart your terminal or run the following command so the system recognizes the newly installed radar:
source ~/.bashrc
🚀 Running Radar on Your Contract
From the root of your project, run Radar with:
radar -p .
This will analyze your entire project, including all contract code using Radar.
Radar will output:
- Console output: Real-time findings with severity levels (Low, Medium, High)
- JSON report: Detailed results saved to
output.jsonin your project directory
Example Output:
[ Low ] Unchecked Arithmetics found at:
 * /path/to/your/contract/src/lib.rs:49:34-44

[i] radar completed successfully. json results were saved to disk.
[i] Results written to /path/to/output.json
💡 Tip: The JSON output (
output.json) contains detailed information about each check, including severity, certainty, and locations of issues. Review it carefully to understand what needs to be fixed.
🏃 Head to your next challenge here.